Deployment
Introduction
We now have a maintainable end-to-end solution, that no one can use – unless they physically access our computer.
In this section, we’ll see how to deploy an ML solution so that our user can consume it, without having to literally hand over our computer.
Someone else’s computer
Back to the big picture of our ML solution, we need our code to run on a remote machine, i.e. someone’s computer, ideally not ours.
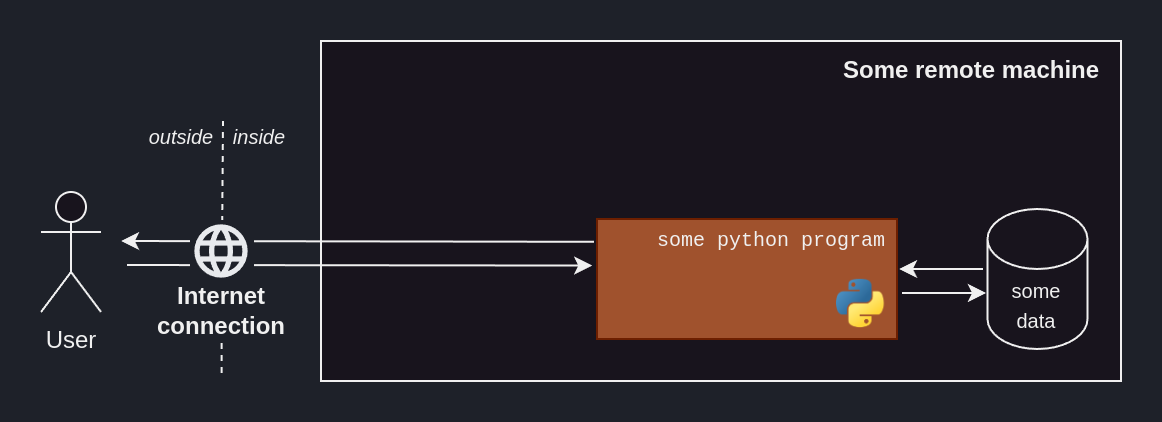
So how about renting someone else’s computer, hosting our code there – now that it’s shareable – and giving our user access to that computer?
That’s where cloud computing comes in.
One way to go about it would be to go on our Azure, AWS or GCP platform and setup a ressource to host our ML solution. What these platforms provide is convenience and scalability, but that comes at a price.
A more hands-on – and cheaper – way of doing this is renting a Virtual Private Server (VPS)1 and setting everything up ourselves.
The internet is ripe with low-cost VPS offers. I went with Infomaniak – a Swiss-based cloud services company – but others exist.
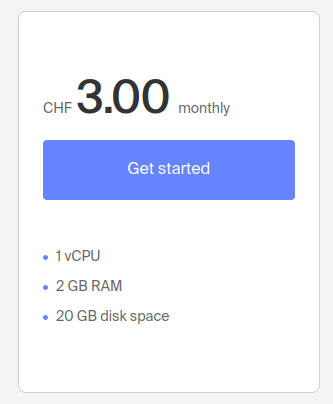
Through the VPS-provider’s website, we order an Ubuntu 22.04.5 LTS and – after a few minutes of waiting – our machine is ready.
Accessing the VPS
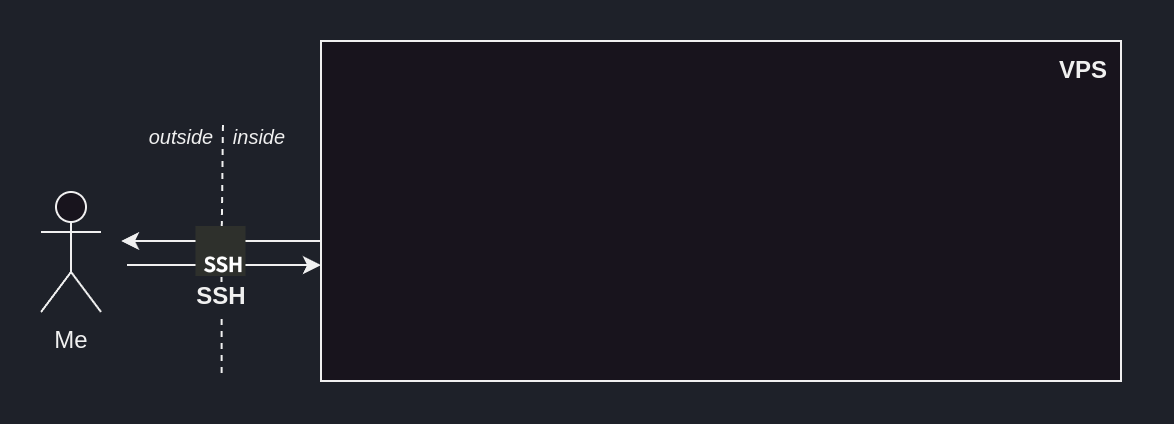
How can we access our newly-created VPS?
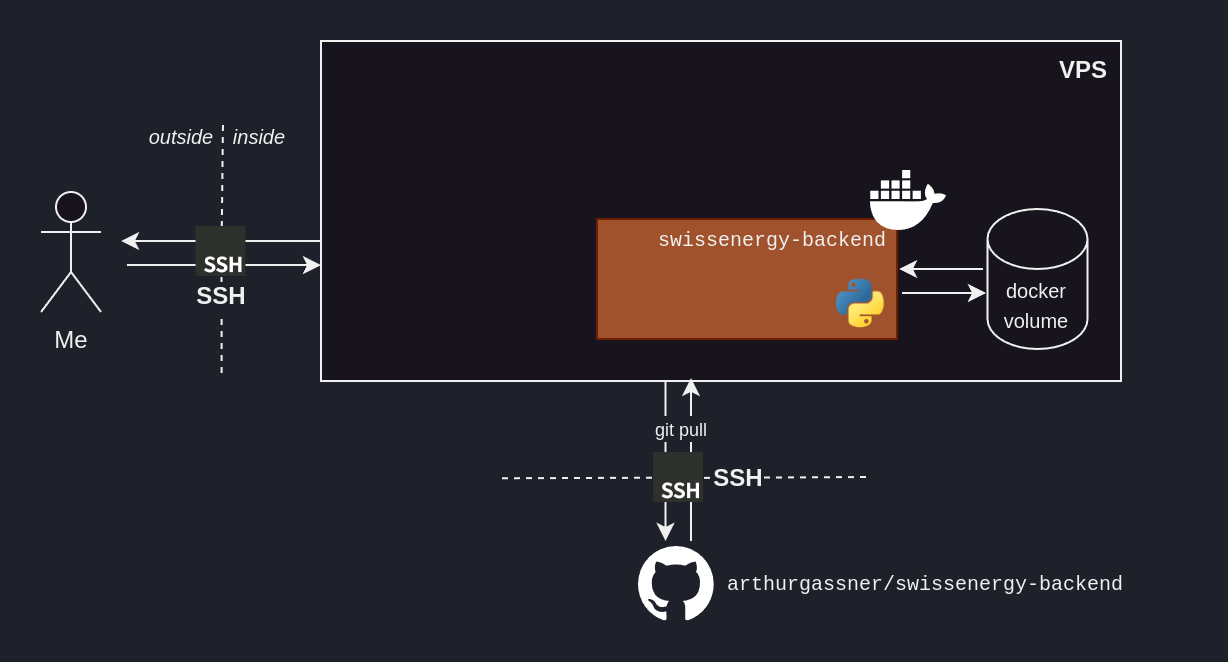
During the renting-out process, the VPS provider – here Infomaniak – gave us a private/public SSH key pair. Knowing the private key, we can authenticate ourselves to our remote machine and hence access it – through SSH – over the internet.
ssh -i <PATH_TO_VPS_PRIVATE_KEY> <USER_REMOTE_MACHINE>@<IP_REMOTE_MACHINE>
How does public/private key encryption work?
Public/private key encryption is a widely-used authentification method.
This method revolves around two “keys”, a key being a long string of seemingly-random characters.
The public key is called public because its owner can share it with everyone.
The private key is called private because its owner should keep it to themselves.
Its core principle is that data encrypted with a public key can only be decrypted with the corresponding private key.
This means that if I encrypt some secret message with your public key – which is public and hence wildely-available –, and you’re able to decrypt it, then it must mean that you have access to the corresponding private key.
SSH – and other protocols, like HTTPS – rely on this property. That’s how our VPS knows that we are who we say we are – i.e. someone who’s allowed in, since we have access to the private key matching their public key.
To make it more comfortable to work on our VPS, we can set it up with our favourite productivity tools, as we would with any newly-installed machine.
Setting up our remote machine
This step is completely up to personal preferences.
On my end, my setting-up-the-vps flow looks like
sudo apt install && sudo apt upgrade # Upgrade the installed-by-default software
sudo reboot

# Install oh-my-zsh
sudo apt install zsh
sudo chsh -s $(which zsh)
sh -c "$(curl -fsSL https://raw.githubusercontent.com/ohmyzsh/ohmyzsh/master/tools/install.sh)"

# Install fzf
git clone --depth 1 https://github.com/junegunn/fzf.git ~/.fzf
~/.fzf/install
# Then, manuall add the below lines to ~/.zshrc to fix some fzf-related bug
# export LC_CTYPE=en_US.UTF-8
# export LC_ALL=en_US.UTF-8

# Install zsh-autosuggestions
git clone https://github.com/zsh-users/zsh-autosuggestions ${ZSH_CUSTOM:-~/.oh-my-zsh/custom}/plugins/zsh-autosuggestions
# Then, manually add zsh-autosuggestions to ~/.zshrc's plugins
Getting our software onto the VPS
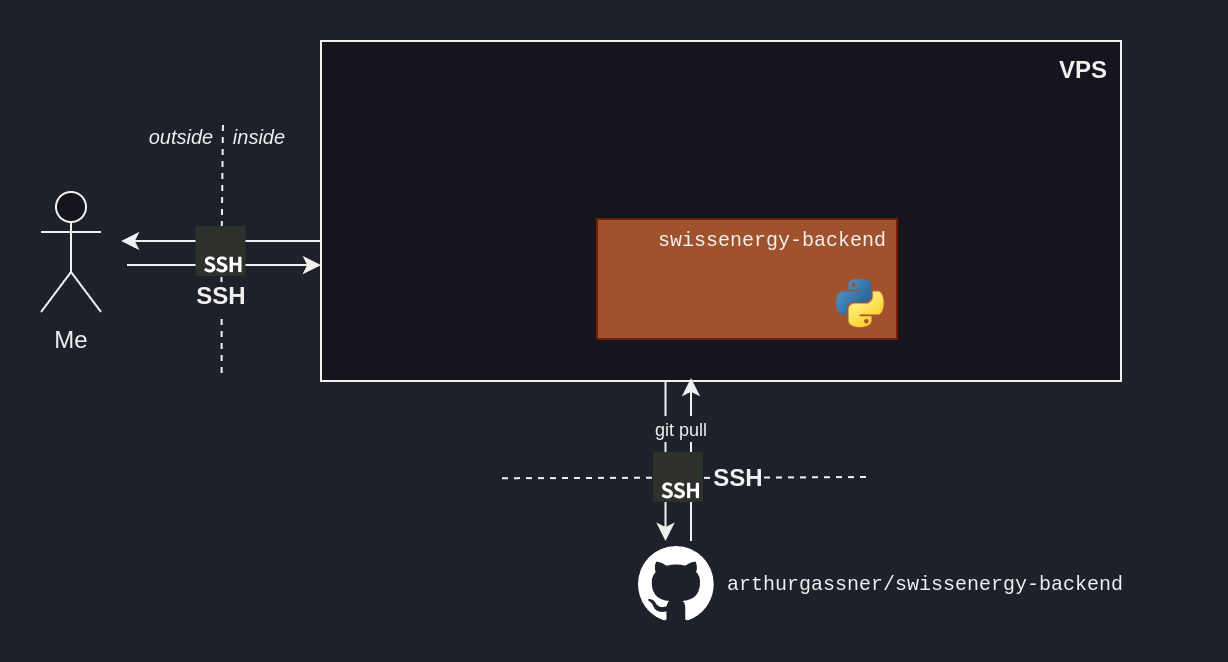
How can we get our production-ready code onto our VPS?
If our GitHub repo is public, we can simply git clone it.
If it is private, then GitHub deploy keys are there to address this need.
They can grant our VPS a limited access – read-only to a single repository – and allow us to easily cancel them in the future.

GitHub deploy keys
A deploy key is a public SSH key that was uploaded on GitHub, granting the owner of the matching private key with access to a single repository.
That access can be read-only, or read-and-write.
Generating a dedicating public/private SSH key pair
As not to use the same SSH key pair for everything, we generate a public/private SSH key pair dedicated to authentifying us to GitHub.
The steps are outlined in the ssh-keygen procedure.
Running our software on the VPS
How can we package our software to ensure it’ll run on our VPS, since the VPS’ environment will differ from our development environment – i.e. my private computer?
Containerization addresses this issue, with tools such as docker.
Through a Dockerfile, we can setup reproducible steps outlining the environment within which our ML solution will live.
We rely on volumes to have data persist when restarting our container.
Our docker volume can be created with
docker volume create swissenergy-backend-data.
Use docker compose
Since we only have a single container, one way to make it run would be to use following command
docker run --env-file ~/swissenergy-backend/.env --name swissenergy-backend -p 8080:80 -v swissenergy-backend-data:/code/data swissenergy-backend-image
Doing it this way is both long and un-versioned.
A better way is to use docker-compose. It is usually used to run several containers at once, but still very useful with only one container.
A command such as the one above turns into a .yml file:
name: swissenergy-backend
services:
  swissenergy-backend:
    build:
      context: .
      dockerfile: Dockerfile
    env_file:
        - .env
    container_name: swissenergy-backend
    ports:
        - 8080:80
    volumes:
        - swissenergy-backend-data:/code/data
    image: swissenergy-backend-image
volumes:
  swissenergy-backend-data:
    external: true
    name: swissenergy-backend-data
We can then build our image with docker compose build, and run it with docker compose run.
To run our containerized ML solution, we run docker compose up, et voilà!

docker compose up from our VPS.Use screen
To have your container run in the background, the screen command is handy and wildly-available, although unintuititive to use.
Accessing our ML solution from the outside
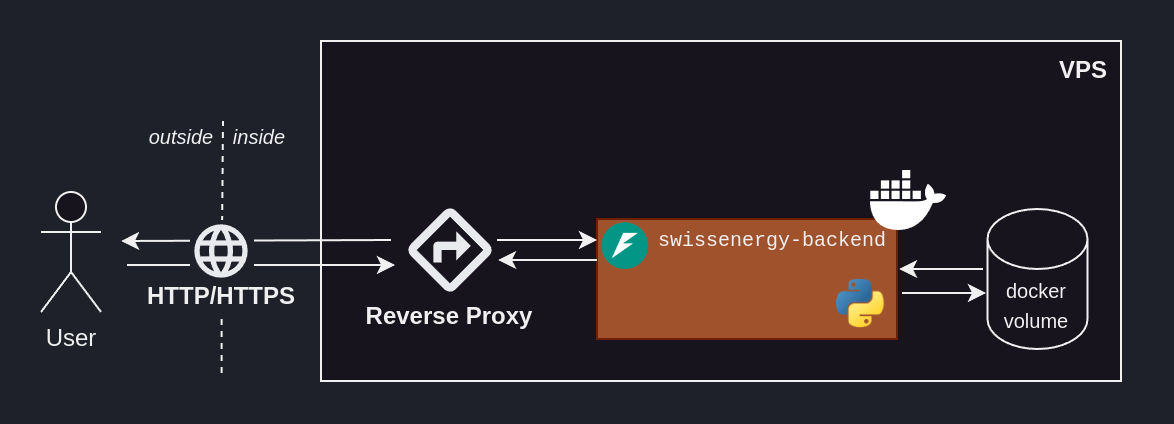
Our containerized ML solution is running on our VPS, and publishing locally on the port 8080.2
Someone outside of our VPS cannot access these routes. A reverse proxy addresses this problem by acting as an interface between the outside – the internet – and the inside.
Setting up a reverse proxy
Caddy is a reverse proxy known for its simplicity and security.
To be able to reach our ML solution from the outside, we need to:
-
Make sure we can reach our VPS by opening up the port
80through your VPS provider – as they likely have their own firewall.HTTP goes – by default – through port
80. -
Set up the
/etc/caddy/Caddyfileto redirect in-bound traffic on port80tolocalhost:8080, i.e. our ML backend./etc/caddy/Caddyfile{ # Disable automatic HTTPS auto_https off } # Route HTTP traffic to our ML backend <VPS_PUBLIC_IP> { reverse_proxy localhost:8080 }/etc/caddy/Caddyfilecontains the config governing Caddy. -
Enable and restart the
caddysystemd deamon.sudo systemctl enable caddy && sudo systemctl restart caddy
And voilà! We can now reach our containerized ML solution from the outside:

by typing our VPS' public IP in our browser's URL bar.
Enabling HTTPS
We now can access our ML solution through HTTP, but not HTTPS.
For the sake of security, we’d like to allow HTTPS traffic, and have all HTTP traffic redirected to HTTPS.
To do so, we need to:
-
Make sure we can reach our VPS by opening up the port
443through your VPS provider – as they likely have their own firewall.HTTPS goes – by default – through port
443. -
Assign a domain – or subdomain3 – pointing to our VPS’ public IP. In practice, this means going on our domain registrar’s website – in my case GoDaddy – and adding a new DNS record of Type A4, whose name is
vpspointing to our VPS’s public IP.This step creates the
vps.arthurgassner.chsubdomain and have it point to our VPS’ public IP. It is needed since TLS5 certificates are usually only issued for domain names, not public IPs. Note that it can take up to two days to take effect, due to DNS propagation. -
Update our
/etc/caddy/Caddyfileto reflect our newly-found preference of HTTPS./etc/caddy/Caddyfile# Redirect HTTP requests to HTTPS # Send a 301 status code, indicating a permanent redirect http://vps.arthurgassner.ch { redir https://vps.arthurgassner.ch{uri} 301 } # Route HTTPS requests to our ML backend https://vps.arthurgassner.ch { reverse_proxy localhost:8080 } -
Restart the
caddysystemd deamon.sudo systemctl restart caddy

vps.arthurgassner.ch.Scheduling automated updates of the forecast
We can now access our ML solution through the internet; amazing!
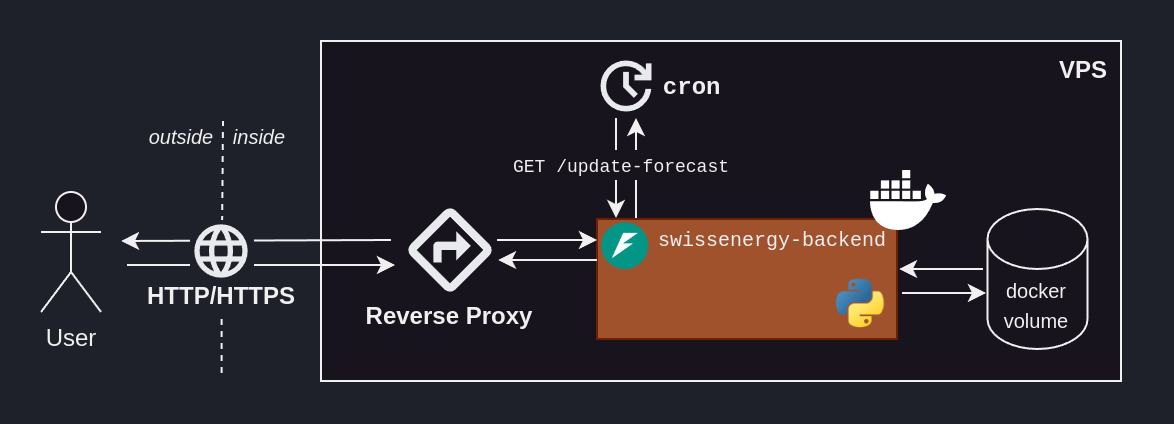
But how are the forecast kept up-to-date? We would like for it to automatically fetch the latest ENTSO-E data, train the model and update the forecasted values – roughly every hour, since the ENTSO-E data gets updated at this frequency.
We built a route into our ML backend – /update-forecast – which triggers this process, but how can we send a GET request to that route at regular interval?
Enters cron, a wonderful job scheduler.
To run a command at the 15th minute of every hour, simply:
- Open the crontab file with
crontab -e - Add the scheduled job
# Every 15th minute of an hour, run this curl command
15 * * * * curl -X 'GET' 'http://localhost:8080/update-forecast' -H 'accept: ap>
And voilà! Cron will run in our VPS’ background, and send our GET request to the our ML backend’s /update-forecast route on the 15th minutes of each hour.
Not exposing /update-forecast to the outside with caddy
Since cron will handle the forecast update from the inside of the VPS, there is no need for us to expose it to the outside.
We can explicitely do that through our Caddyfile:
# Redirect HTTP requests to HTTPS
# Send a 301 status code, indicating a permanent redirect
http://vps.arthurgassner.ch {
  redir https://vps.arthurgassner.ch{uri} 301
}

# Route HTTPS requests to our ML backend
https://vps.arthurgassner.ch {
  # Block /update-forecast by returning 404
  route /update-forecast {
    respond 404
  }

  reverse_proxy localhost:8080
}
Don’t forget to reload caddy with sudo systemctl reload caddy!
cronevery 15th minute of an hour, in perpetuity, ensuring our forecast is fresh.
Conclusion
We now have a deployed ML solution, that can be accessed through the internet.
-
It is basically a piece of physical machine. A lot bit like a Virtual Machine (VM). I really like this solution because one VPS can be used in several projects. It’s like having a side-project-dedicated machine. ↩
-
Which means we can access our solution’s routes from within our VPS, via
localhost:8080/SOME_ROUTE. ↩ -
When you own a domain – e.g.
arthurgassner.ch– you can create subdomains – e.g.thisisasubdomain.arthurgassner.ch– at your will. This can come in handy. ↩ -
Transport Layer Security, the encryption protocol used by HTTPS. ↩